sweet shimmery goodness I’m in love
Some affiliate links are used at no additional cost to you. Thank you for supporting my blog! For more information, visit my Disclosure.

A while back I hosted a giveaway with Cutting Edge Stencils.
Well, the awesome folks there also gave me a stencil of my choice to try out!
I chose the Marrakech Trellis stencil in the long size.
Initally I wanted to use it in out bedroom, but never got around to pulling the bed out yada-yada…
But, when my mom mentioned she was redoing her small sitting room I knew a stencil would be PERFECT for that space.
Here’s her space before the putting up the stencil
How It Went
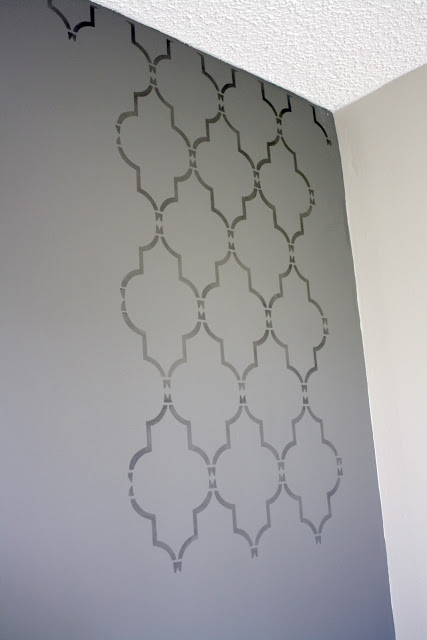
The wall’s base color is Glidden’s Fauna and we used Lowes’ Valspar metal and patina glaze in Pewter for the stencil.
The stencil came with 3 pieces: ceiling/top piece, main body piece, and side piece. I chose to start with the ceiling stencil piece, and ran it all across the top of the wall.
The main stencil lined up easily with the top portion, and was held in place with painter’s tape.
Sweet immediate gratification!
And, would you check out that shimmer?!
Yes please! Me likey 😀
The rest of the project FLEW by. The main body piece of the stencil is huge so you cover a lot of ground quickly. Big plus for me since I’m incredibly impatient. After I finished up with the main body piece, I used the smaller side piece to fill in the edges of the wall.
Here’s the finished wall!
The sun had already gone down by this point so you kind of miss out on how amazing the glaze looks and changes in the sunlight.
It really looks like wallpaper vs. paint due to the glaze.
Tips
-
Definitely don’t over load your roller. The least amount of paint/glaze on the roller is best since too much paint/glaze is what gives you gloppy edges.
-
Try different sheans of paint or glazes together. I think what made this look so great was using a shimmery glaze over a flat paint. I think another fun look would be using a gloss paint over the same color flat paint.
-
Map out how your stencil will be placed before jumping in and painting. I started out by holding the upper ceiling and side pieces in place to see how it would line up with my main body piece. That way I didn’t run into any issues with placement after it was too late.
My Thoughts
Initally when everyone started talking about how stencils were making a comeback I said to myself, “NEVER!”
I immediately thought of the small stencils my mom put up as borders in the house back in the 80’s. She spent SO much time on those things. Using the little stipple brushes, special paint, etc.
These are totally not your mother’s stencils 😀
-
Really quick process due to the large size of the stencil. This wall was completed in 2 hours (with a 2 year old running around)
-
Easy to use. Directions are sent with the stencil. And, if you learn best by watching, they have video tutorials on their website.
-
The extra pieces for the ceiling and sides make getting into difficult spots so much easier.
-
Easy clean up. Since the stencil is so large I put it in the bottom of the bath tub to clean off. Any paint that was stuck in the smaller parts/edges of the stencil cleans of easily with an old toothbrush.
-
Durable. There was no damage to the stencil after clean up, and the material is thick enough to use over and over again. More bang for the ol buck!
Never would I have thought I’d like a stenciled wall, but I’ve got to admit it, I really love with the way my mom’s wall turned out.
She keeps hugging me and telling me thank you so I think she’s pretty pleased with it too 🙂














Comments
NewestThis looks amazing! I love it. Question about the paint/glaze that you used… is there only one color or can you get it tinted however you like?
It comes in a few different metallic colors; pewter, silver, gold, bronze, and copper. My mind is already thinking up paint combinations to use with them!
Where can you buy the glaze..I just painted my kitchen semi gloss grey and decided what color I shoukd use for stencil
I mean I can't decide on a color for stencil, can use some pointers
Gorgeous!
Oh my goodness…it's amazing what a little change can do to a room! Gorgeous!
It's crazy how a simple stencil can make a room look so much better! PRetty!
This is soooo beautiful! I wonder if my mom would like something similar in her kitchen with a gray wall? I might have to try it since you said it's not too time consuming (I have a very short attention span). Thanks for sharing!
Oh it looks gorgeous!! Totally brings something special to that space. I just won a Cutting Edge stencil and haven't decided where I'm going to use it yet – thanks for the inspiration!!
It makes such a huge difference on that big wall! Great job.
Wow it looks so amazing! I wish the one I did came out better but I also should of did a color like you did. Awesome job!
Oh and also I'm giving away a pretty orange dress from Shabby Apple…if you want to stop by it ends 1/23
Turned out absolutely fabulous, Shelley! I actually just found you through a search for info on Cutting Edge stencils because I'm about to host a giveaway for them and tackle a project of my own.
So glad I clicked, though. Your blog is great!
I'm off to do some clicking around, but I'd be thrilled if you'd link this up at Feature Friday Free-for-All (last week's party just closed, but I'll have this week's up and running later on this evening).
P.S. I'm a new follower. : )
~Abbie (www.fivedaysfiveways.com
The stencil looks awesome!! What a huge change a little stencil can make!
I love it! The shimmery paint you used for the stencil is perfect. I think it would also look nice with a straight glaze so the pattern is a shimmery version of the wall colour.
The ceiling & corner stencils are a great idea. It would be really hard getting that big stencil into the tight spots.
Your mom's room looked fantastic before – now it's uber-fantastic! Great job!
Looks awesome!!! I really want to try a stencil, but haven't decided where… any suggestions?
This might have been the convincing post about stencils! Looks great.
This looks amazing!
Hello! I featured this tutorial on my blog (:
http://thisblackbirdsnest.blogspot.nl/2013/10/home-decoration-diy-roundup-1-walls.html
Where I can buy it????
it's from Cutting Edge Stencils. If you check out the post, the pattern is mentioned at the very top. Thanks for your interest!
Hi,
You did an awesome job! I love the color combo you chose. Can I ask what type of glaze/paint you used? Thanks!
The wall's base color is Glidden's Fauna and we used Lowes' Valspar metal and patina glaze in Pewter for the stencil.
Your Glidden color looks NOTHING like the "original" which is obviously in the Gray family. Interesting too, the 1st pic or two where you STARTED the project, appears to have been started on the GRAY wall, yet the "after" picture is CLEARLY not Gray.
You sure are are keen at picking up details! I'm surprised you didn't notice that the before picture was taken during the day with natural light coming in from the window, and the second was taken at night with the lights on. Natural light and artificial light (lamps, etc.) change the look of paint color. Thanks!