if you’re gonna refinish a piano…
Some affiliate links are used at no additional cost to you. Thank you for supporting my blog! For more information, visit my Disclosure.

…the first thing you’re going to need are the balls to get started!
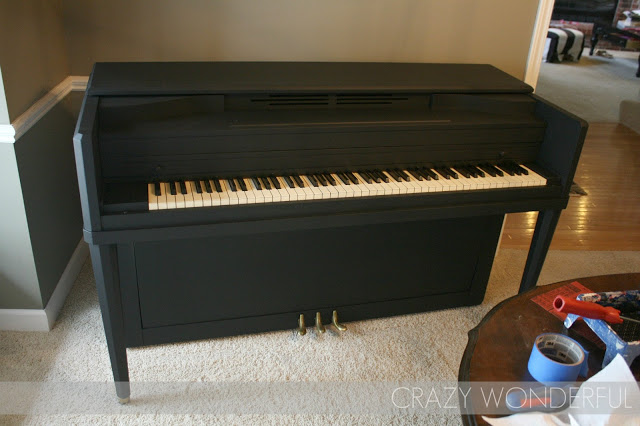
This is my grandmother’s piano
I have so many fond memories of sitting at this piano with my grandmother as a child. To me it was magical.
When the piano came to me I had no plans to change it, just leave it as is. But, every time I walked passed I noticed just how old she was looking with gashes and some of the veneer peeling away. So after months and months of waffling I finally decided to fix the bad spots and refinish her. Deciding to do it was much easier than actually diving into it. I was skeerd!!!
Then one day I grew some balls, and without planning on it I ran to the garage and came back with some sandpaper. In less than an hour she was all sanded! “Looks like there’s no turning back now!”
A couple of hours later, after a quick trip to the store, she was primed.
And the next day she was wearing her first coat of black paint!
I’ll admit, I was feeling a bit cocky at this point. I was shocked at how quickly everything was moving, and was wondering why I hadn’t tackled this project sooner.
Then reality set in as the tedious task of applying polyacrylic and sanding over and over took hold. “Ahhhhhh!!!! Someone make it stop!!!!” In the end it was totally worth it, and honestly not as painstaking of a process as I imagined it to be.
I think grandma would be pleased 🙂
Here are some pointers if you get the balls to refinish a piano 😉
1. Take apart as much of the piano as you’re comfortable with. Some tutorials took all the keys out. That FREAKED me out so all I took apart was the music stand, the top cover, and the front panel that hides the guts.
2. Use wood glue to reattach any veneer that’s pulling away, and wood filler for any gashes.
3. Cover the keys before sanding to avoid dust getting in and causing the keys to rub or possibly seize up. I used paper. Don’t forget the primer!!! It will get that paint a stickin and will keep you from having to use multiple coats of paint.
4. If you’re leaving the keys in place like I did, use a metal spatula to push the keys down and protect them when applying the primer, paint, and poly.
5. Use flat paint and a polyacrylic to achieve a nice high gloss look. The flat paint adheres really well, and the polyacrylic will give you the gloss look without yellowing over time.
6. A small arts and crafts brush comes in handy for working in tight areas, and for the space right above the keys that I mentioned in Tip 4.
Some useful tutorials:
I’ll be linking up to these fab parties!
The DIY Project Parade at The DIY Showoff, CraftOManiac Monday at CraftOManiac, Before and After Party at Thrifty Decor Chick, Tutorials and Tips at Home Stories A2Z, Nifty Thrifty Tuesday at Coastal Charm, Amaze Me August at Bella Before and After, DIY by Design, Tip Me Tuesday at Tip Junkie, Show Me What Ya Got at Not Just a Housewife, Tuesday Confessional at Confessions of a Stay at Home Mommy, Tuesday To Do at The Blackberry Vine, Will Craft For… at Tales of a Trophy Wife, Show and Share at Southern Lovely, Tuesday Talent Show at Chef in Training, Tuesday Link Party at Todays Creative Blog, Will See It Wednesday at Fabric Bows and More, What’s Up Wednesdays at Sew Woodsy, Wow Us Wednesdays at Savvy Southern Style, Wow Me Wednesday at Ginger Snaps, Primp Your Stuff at {Primp}, Whatever Goes Wednesdays at Someday Crafts, Look What I Made! at Creations by Kara, What We Wore and Made at Rae Gun Ramblings, Creative Juice Thursday at Momnivore’s Dilemma, Everything but the Kitchen Sink at A Little Knick Knack, Delightfully Inspiring Thursday at Delightful Order, Making it with Allie at What Allie’s Making Now, Suzy’s House Party at Saved by Suzy, Haute Stuff Thursday at Frugalicious Me, Frugalicious Friday at Finding Fabulous, Remodelaholics Anonymous at Remodelaholic, Frugal Friday at Shabby Nest, Fancy This Fridays at Truly Lovely, Feathered Nest Friday at French Country Cottage, Furniture Feature Friday at Miss Mustard Seed, Weekend Wrap Up at Tatertots and Jello, Flaunt it Friday at Chic on a Shoestring, Simply Link Party at Simply Designing, Simply Creations, Friday at Simple Home Life, Pity Party at 30 Handmade Days, Delicately Constructed Fridays at Delicate Construction, Inspiration Friday at At the Picket Fence, VIP Party at Designer Garden, Feature Friday at Five Days… 5 Ways, 365 Link Party at Two Thirty-five Designs, Weekend Link Up at Bacon Time with the Hungry Hypo, The Saturday Seven at Positively Splendid, Nifty Thrifty Sunday at Nifty Thrifty Things, Creative Bloggers’ Party and Hop at Homemaker on a Dime, Sunday Showcase Party at Under the Table and Dreaming












Comments
NewestI'm not sure if i'm more impressed with your AMAZING piano transformation or that you took the time to add ALL THOSE LINKS!!! Girl, this is awesomeness!
Oh Shelley, it's beautiful. You did such an amazing job. I'm sure your grandma is very proud of you for breathing new life into the piano. Well done!
WOW, shelley! it looks amazing!!!!!!
Looks amazing! Kudos to you for doing it. Not everyone has the guts.
Wow! It looks amazing! I have a piano in my living room that has been in the family for some time that I've been debating on refinishing…someday I'll get the balls! 🙂
WOW! I love it!! It looks amazing!
I L-O-V-E it!! Didn't know the tip about flat paint plus poly…you're so smart!! 🙂
WOWZA! What a great transformation. I admit, I was a tad nervous when you originally said you would be painting it. You sure showed me!!
WHOA. Amazing. I own a very old piano and I had to book mark this in case I ever want to refinish. Lovely, awesome (and every other positive adjective) job! =)
Kristina J.
Beautifully done, Shelley! You are a brave woman! lol! 🙂
xoxo laurie
wow inspiring…great job!
It's gorgeous. I've always wanted one – even though no one in our house plays. Yet. 🙂
It turned out really, really nice.
You have a beautiful blog with a lot of inspiring posts! Congrats on your work! Would you like t follow each other?:)
Your piano turned out fab! Mr. Woodsy almost got his hands on a free piano and the first thing he said was that he wanted to repaint it if we got it–we never ended up getting it but if we ever get one I will definitely come back to your tutorial for motivation and inspiration! By the way I featured your post today on Sew Woodsy!
I love how this turned out!! All that work was worth it:)
She is smiling right now. That piano was a staple in her home and I am soooo glad that you have it. I was kind of worried that no one would take it and when my mom told me you were taking my heart felt full. You know how sentimental I am with things like this. I hope it stays in our family for many more generations!
Wow, your piano is stunning! That was one huge undertaking, but it was most definitely worth the effort!
That is just gorgeous! It's so classy and looks like it was meant to be that way!
I have an upright that we bought for the kiddos for lessons years ago (that didn't exactly work out, one lasted through 6 mos of lessons, the other only 1 year). It has some bad varnish and a little damage but is a decent piano. And now I think you've given me the courage to paint it with your pretty pictures!
Wow! That took some guts! Looks great now 🙂
Featuring your awesome piano redo on the blog today! : )
Wowza! That took a lot of balls 🙂
The transformation is beautiful!
You are insane. Wow! Way to go, Shelley! You can seriously do ANYTHING!!!
Wow what a difference. Looks great! Would love you to share on my linky party! http://www.igottatrythat.com/p/blog-hop-linky-colde.html
Thanks
Marcie @ http://www.IGottaTryThat.com
Hi Shelley! Thank you for the tutorial. The piano looks amazing. I am thinking about doing it with my old piano. Did you do anything to keep dust off the stings?
Thanks Amanda! I sanded most of the piano while the front cover was still in place to keep the majority of the dust away from the strings. I guess you could always tape a trash bag over the area too??
I have been thinking about refinishing a piano that we inherited. I love the way your piano looks after your refinishing job. My piano is an antique and I really want to keep the integrity of the original wood. Do you think it would be hard to just stain it? http://www.jfcrefinishing.com